Last updated on 2025-08-27, by
How to Record Videos on Mac with 5 Mac Video Recorders?
Summary:
- This article will share five ways to record videos on your Mac, including Mac built-in tools, 3rd-party screen recorder software, and capture card.
Sometimes you just simply want to record your Mac screen, maybe you want to create tutorials, save streaming content, or just simply want to record gameplay. When you know the right method it’s easy to record videos on Mac without losing your video quality. Macs offer a variety of options for both casual and professional use. From simple webcam videos to full-screen recordings with audio and system sound, you can record everything. This article will share five best ways to record videos on your Mac.
OutlineCLOSE
- How to Screen Record on Mac with Built-in Screenshot Utility?
- How to Record Video with a Webcam on a Mac Using a Photo Booth?
- How to Record Video with Audio on Mac Using QuickTime Player?
- How to Record Video on Mac with Video Recorder Software?
- How to Record Video on Mac with a Professional Capture Card?
How to Screen Record on Mac with Built-in Screenshot Utility?
The first way to screen record on Mac is to use a built-in screen recorder. Built-in screen recorder is available on macOS Mojave or later, is free, simple, and fast to use, making it perfect for tutorials, demos, or quick recordings. However, it has certain limitations. For example, there will be limited editing tools and you cannot record system audio directly without workarounds. Here’s how to use it:
Step 1: First go ahead and open your Mac’s Launchpad and launch the Screenshot utility.
Step 2: Next select the recording option. You can record the entire screen or any part you want.
Step 3: In the end you can click on Options button to choose microphone, change save location, delay setting etc.
Step 4: After you tweak everything, click the Record button to start recording your screen.
Step 5: When finished, tap the Stop Recording button in the menu bar.
Later you can find files in your preferred saved folder, or by default you can find it in the folder on your desktop.
How to Record Video with a Webcam on a Mac Using a Photo Booth?
The next method you can use is the Photo Booth tool. Especially for personal or casual video recording, Photo Booth is a simple and convenient choice. This tool will integrate seamlessly with your Mac’s built-in camera. This built-in feature makes it easy to record videos without installing additional software. However, this method also has some limitations. The main limitations are that it only works with the webcam. That means it offers limited resolution and audio control, so it’s best for quick clips. Not an ideal solution for professional recording needs. Here’s how to record a video on Mac using Photo Booth:
Step 1: Launch Photo Booth. Find the Photo Booth icon in your Mac Dock or search for it in your Applications folder and double-click to open.

Step 2: Click Record a movie clip in the bottom-left corner to turn on your webcam.
Step 3: Your face will appear in the window now. Click the red Record button to begin recording. Your facial expressions and gestures will be recorded in real-time. Click the red button again to end the recording.
After you’ve recorded your video, it’s simple to share with friends and family. In Photo Booth you can also apply fun effects to make your videos more engaging and visually distinctive.
How to Record Video with Audio on Mac Using QuickTime Player?
The next method to record video on Mac is by using QuickTime Player. We know it’s Apple’s native video app. However, what you don’t know is the app is not just for playback, you can also record videos using your webcam and capture external audio. It’s free, pre-installed, and supports both screen and webcam recording. When it comes to its limitations it offers no advanced editing tools and cannot record internal system audio without third-party add-ons. Follow the below steps to record video with audio on Mac using QuickTime Player.
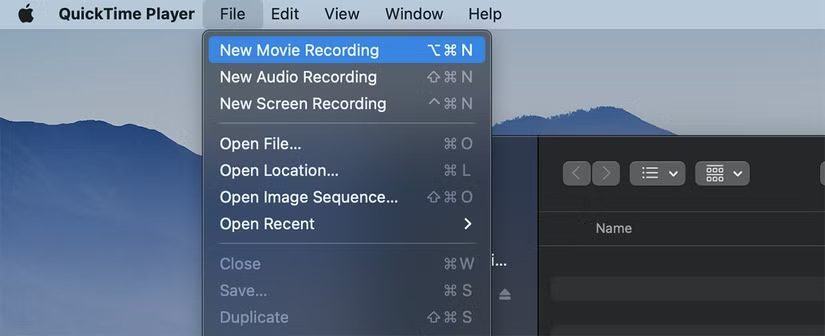
Step 1: Open QuickTime Player on your Mac.
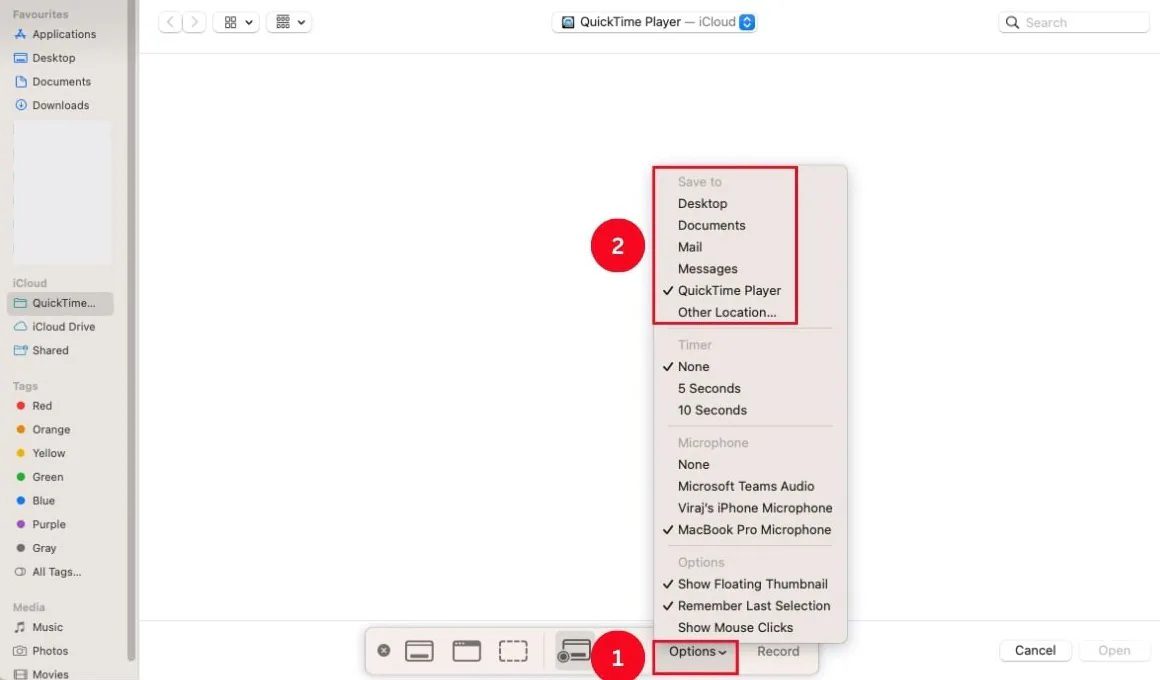
Step 2: Select File > New Movie Recording from the menu or use the keyboard shortcut Cmd + Option + N. A preview of your webcam will open so you can frame your shot. (The video is displayed as if it were mirrored, unlike Photo Booth.)
Step 3: Click the small arrow next to the record button to choose which video and audio sources you want to use if you have more than one webcam or microphone connected. You can also select the quality of the recording in this window.
Step 4: Click the red Record button. Click the Record button again to stop recording when you are done.
Now you will have the final recording. You can also do simple edits using the Edit menu. QuickTime Player is a nice option for creating tutorials, vlogs, or any other personal projects.
How to Record Video on Mac with Video Recorder Software?
If you are someone who is looking for more advanced features while recording your video on Mac, then it’s best to add Third-party tools. A reliable third-party video recorder will offer more advanced features. Some good tools you can try are Moyea Streaming Video Recorder, iFun Screen Recorder, Camtasia, etc. A downside is that most of them require a paid license for full functionality. Here’s how to record an online streaming video using Moyea Streaming Video Recorder:

-
Moyea Streaming Video Recorder
Professional streaming video recorder to capture on-demand videos, live streams, social media clips and more with an ad-filter, regardless of DRM protection.
- Support up to 4K 60FPS video recording.
- Record online videos at up to 5x speed.
- Save recordings to MP4/MKV file without quality loss.

Step 1: Open Moyea streaming video recorder and play video you want to record.
Step 2: Click the Record button, it will open the settings panel. Here you can adjust recording preferences.
Step 3: You can choose audio sources. Video resolution and output format here.
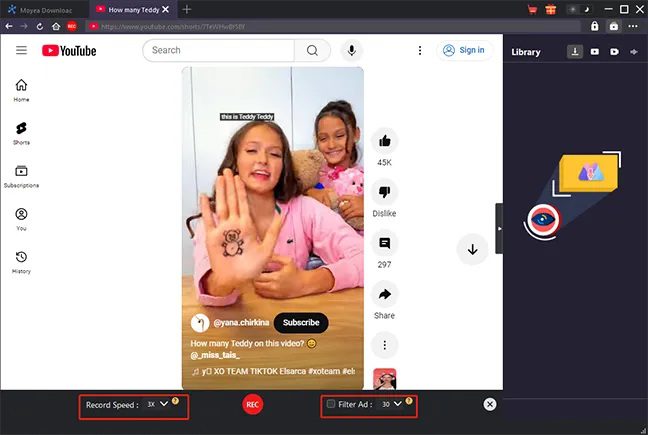
Step 4: Click Start Recording to record your video. Once your video recording is done, stop the recording and save the file.
How to Record Video on Mac with a Professional Capture Card?
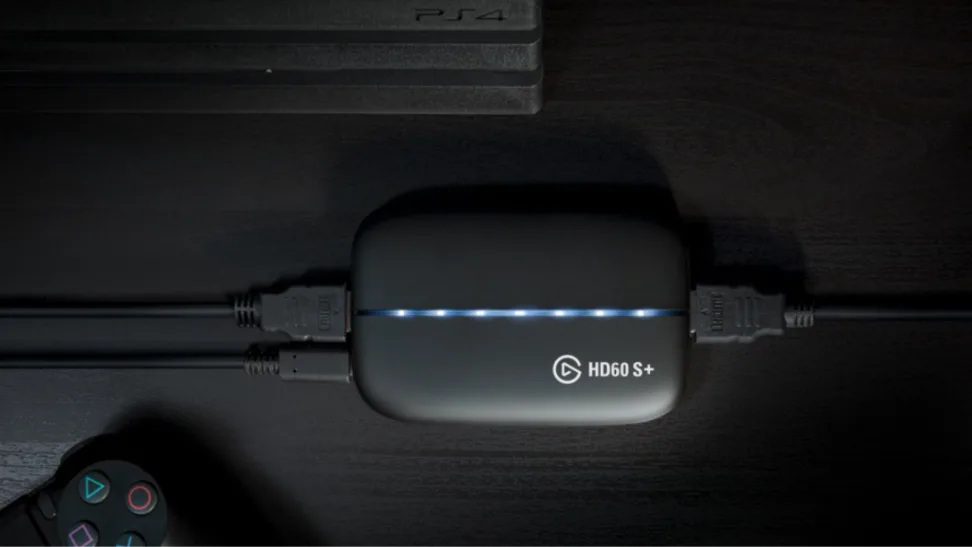
If you’re looking for the best possible quality, especially for gaming, live events, or other external video sources, then a professional capture card is the best option for you. Capture cards record in advanced frame rates and resolutions. Also capture cards have low-latency recording capabilities to capture video from cameras and consoles straight to your Mac.
However, a capture card solution has some advantages as well. For instance, it needs extra equipment. So, ultimately, it will increase costs, and the setup procedure is more complex than software-only solutions. Your capture card requires connection to your Mac through USB, Thunderbolt, or HDMI ports for setup. You will need to install drivers and software and configure recording options after setup. Furthermore, you will have to install necessary drivers and software before configuring recording settings. At the end you can use software like OBS Studio or Elgato to record video and stream along. This method is best for professionals.
Also Read: Tips to Watch Hulu on Mac | Download Movies from Netflix | Record YouTube Videos on PC
Final Thoughts
I hope you have found a perfect solution to record videos on Mac with the above 5 methods. When you will have the complete knowledge of pros and cons of each feature then you can select the right method to record videos on your Mac. For offline or flexible recording, Moyea streaming video recorder makes it easy to save streaming content in high quality, ensuring your videos are always ready to watch or share.
-
How to Use Hulu Picture-in-Picture Mode on Any Supported Device?Patrick Murray/2026-04-29
-
How to Watch Deleted YouTube Videos?Patrick Murray/2026-04-29
-
Twitch VOD: What It Is and How It WorksSunny Wen/2026-04-24
-
Full Review of Savethevideo: Is Savethevideo Safe?Patrick Murray/2026-04-21
-
Fix Guide: Prime Video Download Not WorkingPatrick Murray/2026-04-21
-
Is Crunchyroll Free? How to Watch Anime Without PayingSunny Wen/2026-04-20
-
StreamFab Netflix Downloader Review: Features, Pros & ConsCassie J./2026-03-31
-
5 Hulu Family Sharing Tips for Smooth ViewingCassie J./2026-03-30
-
Netflix Not Working on Roku? Solve It NowCassie J./2026-03-27
-
3 Proven Ways to Watch Netflix Without AdsCassie J./2026-03-25


-
Top 5 Udemy Downloaders to Download Udemy Courses on PCPatrick Murray/2025-07-03
-
Best 9 Anime Download Sites to Download Anime [Free & Paid]Patrick Murray/2024-07-12
-
4 Best DRM MPD Downloaders in 2026Leia Liu/2025-05-29
-
HBO Max with Ads VS. No Ads: What Are the DifferencesLumi/2025-05-13
-
6 Best M3U8 Downloaders to Download M3U8 PlaylistsLumi/2025-05-22
-
[2024] How to Download DRM-Protected M3U8 VideosLumi/2024-10-29
-
How to Stream Prime Video on Nintendo Switch?Patrick Murray/2024-09-14
-
How to Activate Tubi on Different Devices? [LG, FireStick, Roku, PS5…]Cassie J./2024-09-24
-
[2026 Latest Review] Best Amazon Prime Video DownloadersPatrick Murray/2025-05-16
-
How to Download an MPD Video with DRMLeia Liu/2024-09-20


Related
Apowersoft Streaming Video Recorder Review: Features, Pricing, and Alternatives
YouTube TV DVR: How It Works and How to Record Live TV

Crunchyroll Offline Viewing for Travel: How to Watch Anime Without Internet

What Is Sling FreeStream and What You Get for Free

How to Record Your Favorite Shows on YouTube TV

How to Make YouTube Safe for Kids: Tips Every Parent Should Know