Last updated on 2026-03-17, by
How to Record Twitch Streams? All Methods Explained
Summary:
This blog will introduce 4 useful methods to record Twitch streams and a bonus tip for saving Twitch streams easily.
Do you want to capture your favorite live streams or even someone else’s epic gameplay? Same here. As someone who has spent countless hours streaming and watching on Twitch, I know how frustrating it is to miss a great moment during a live broadcast. In this guide, I will share everything I’ve learned about how to record a Twitch stream. You can find the most reliable Twitch recorder options and learn how to record a Twitch stream easily.
OutlineCLOSE
1. Can You Record Twitch Streams Directly?
Now you might be wondering: can you screen record Twitch natively? According to my research, Twitch does not have a built-in screen recorder to capture live streams from other people directly from the browser. But it lets me record my own content via VODs. Let’s see more specifics soon.
Recording Your Own Streams with VOD
When I first started streaming, Twitch’s built-in Video on Demand (VOD) feature was truly a lifesaver. After each stream, Twitch automatically saves my content as a VOD for up to 14 days(60 days for Partners or Turbo users). Here’s how to record a Twitch stream with it.
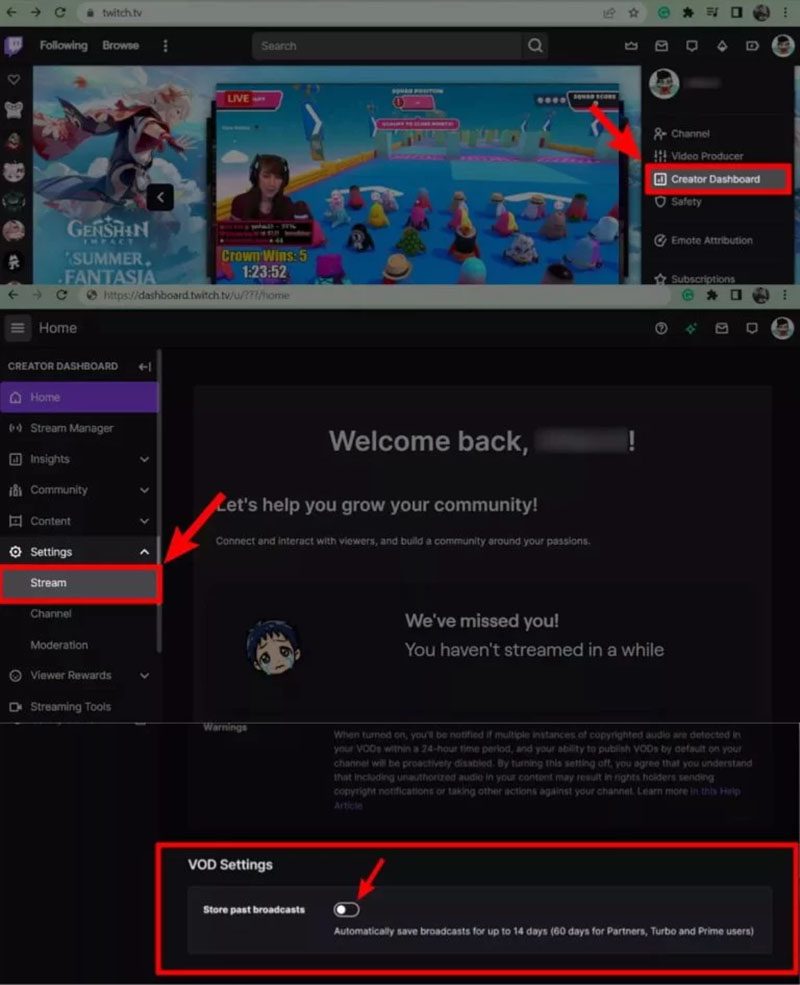
- Step 1. First, I need to go to Creator Dashboard > Settings > Stream and toggle on “Store past broadcasts” so Twitch automatically saves my streams.
- Step 2. Then I start my broadcast, and Twitch records it in the background.
- Step 3. After streaming, I can go to Creator Dashboard > Content > Video Producer to locate and download the saved VOD.
While the feature seems quite handy, there are limitations you should not ignore.
- VODs are only saved temporarily(14/60 days). So I really can not rely on them long-term.
- Saved broadcasts quickly fill up storage. I have to manage or delete content often.
- For the stream I don’t own? There’s no way I can record them. It makes sense, though, given the copyright protection.
- The downloaded VOD quality is capped at the original stream settings, so sad.
- I can’t download multiple VODs at once. It’s so tiring when I have to download many videos.
2. How to Record Twitch Streams on Windows or Mac
After testing dozens of options, I have found several methods that can record videos on Twitch. I will walk you through each with my real-world results.
Method 1 — Screen Recording with CleverGet Recorder
The first and most powerful Twitch recorder I recommend is CleverGet Recorder. I have captured 4K 60FPS gameplay without missing a beat, and it can even skip ads automatically. Compatible with Windows and macOS, it’s a fast and high-quality Twitch recorder that can handle live streams like a pro!
Step 1. I downloaded and installed CleverGet Recorder from the official site.
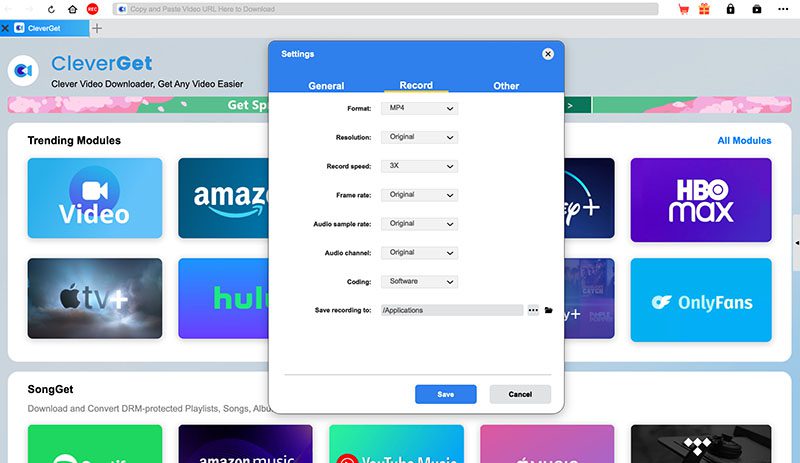
Step 2. Open the app, I click the three-dot menu > Settings > Record tab. I set Format to MP4, Resolution to match the stream (up to 4K), and Frame Rate.
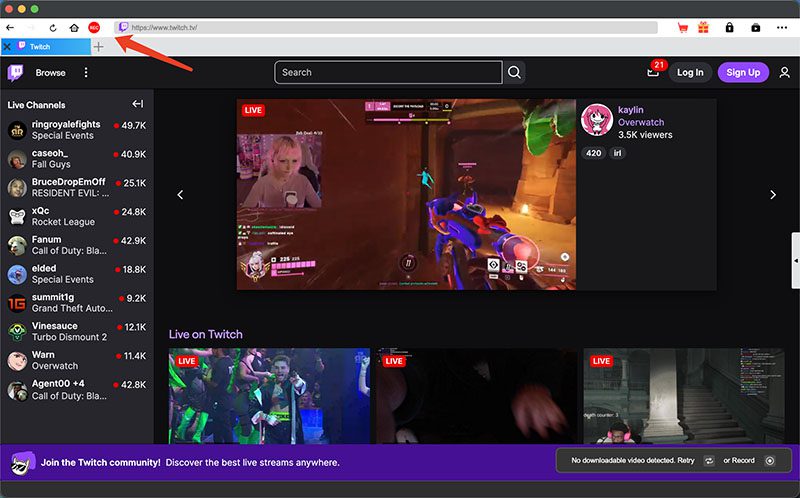
Step 3. I use the built-in browser to visit Twitch.tv and open a video. I click the red REC button on the toolbar.
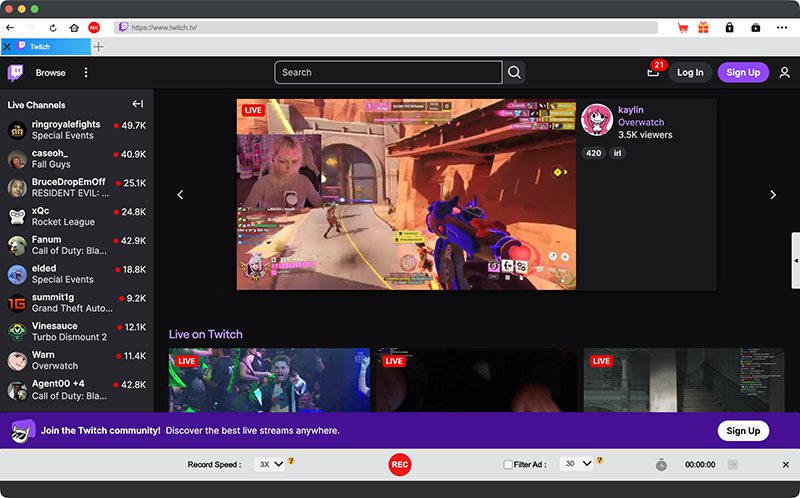
Step 4. I adjust the recording speed and ad filter. Click the REC button to start recording.
Method 2 — Record Twitch Streams with OBS Studio
How to record someone else’s Twitch stream easily? The free and open source OBS Studio is the second Twitch recorder I want to recommend. I use it to capture Twitch streams with high-quality video and audio without lag. However, the interface is pretty complex, and I have to navigate through tons of menus from the beginning, which is truly a steep learning curve.
Step 1. I downloaded and installed OBS Studio; it’s completely free to use.
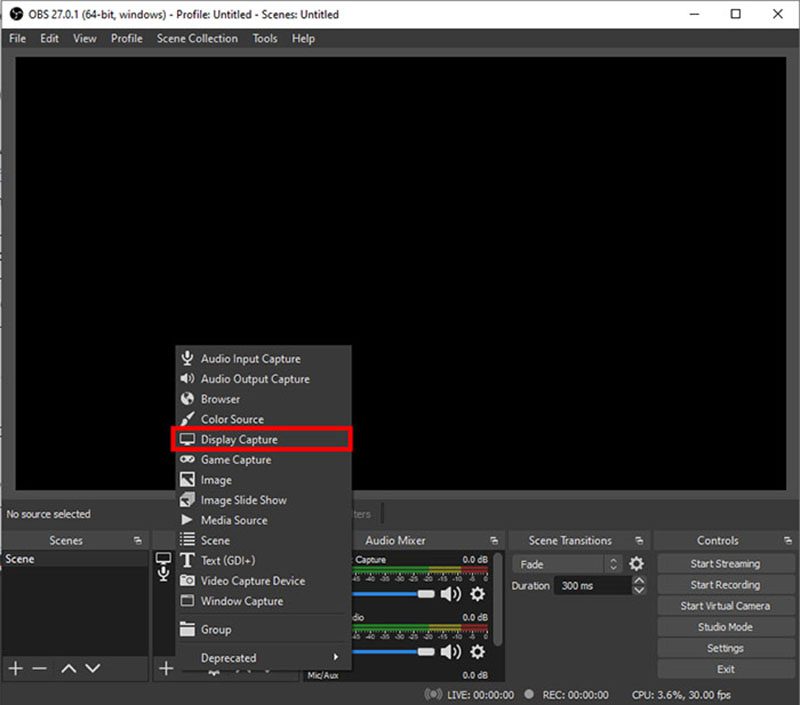
Step 2. I launch the program and create a Scene first. Then I click the + icon in the Sources box, select Display Capture, and choose my browser window from the dropdown.
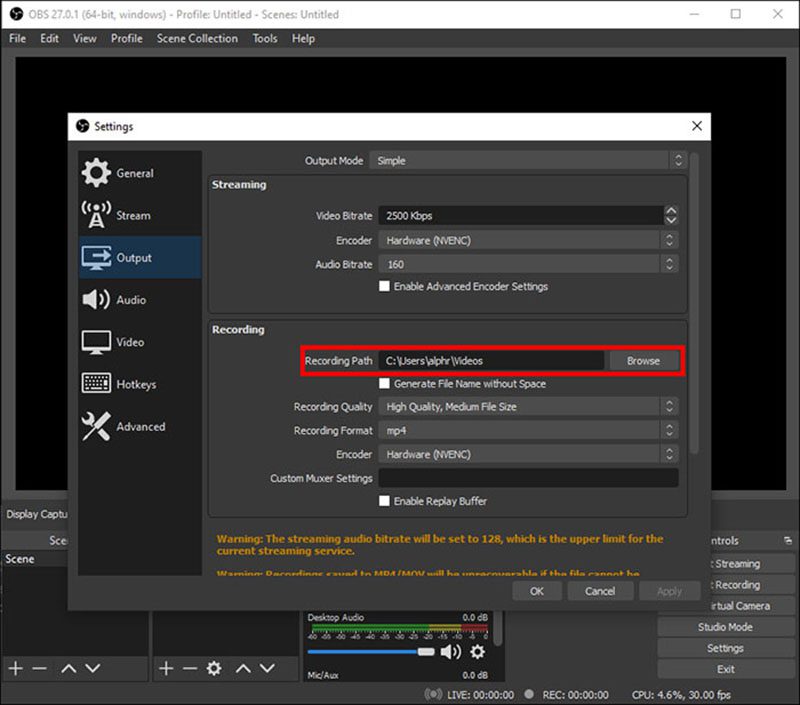
Step 3. I click Settings at the bottom right, go to the Output tab, and set my Recording Path. Then I pick MP4 as the format, and keep the default high-quality settings.
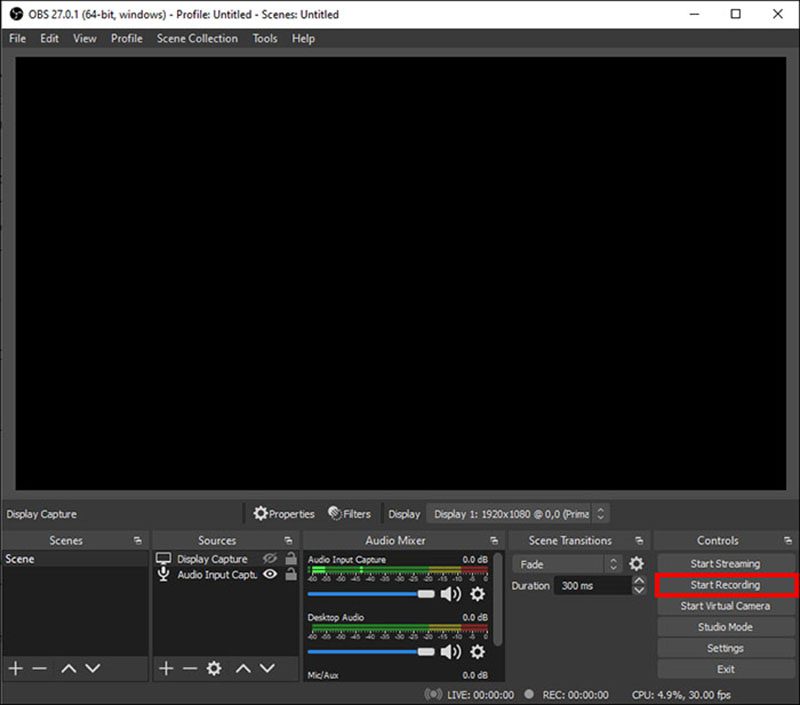
Step 4. Once the Twitch stream is playing, I simply click Start Recording in the Controls box, and that’s it.
Method 3 — Record Twitch with XSplit Broadcaster
XSplit Broadcaster is a premium tool I once tried, and it turns out to be brilliant for high-quality recording(1080p/60FPS). It can handle live streams smoothly and offers built-in encoding. Even its free version is good enough as a Twitch recorder. According to my testing, it can capture Twitch streams without black screens or lag.
How to steps:
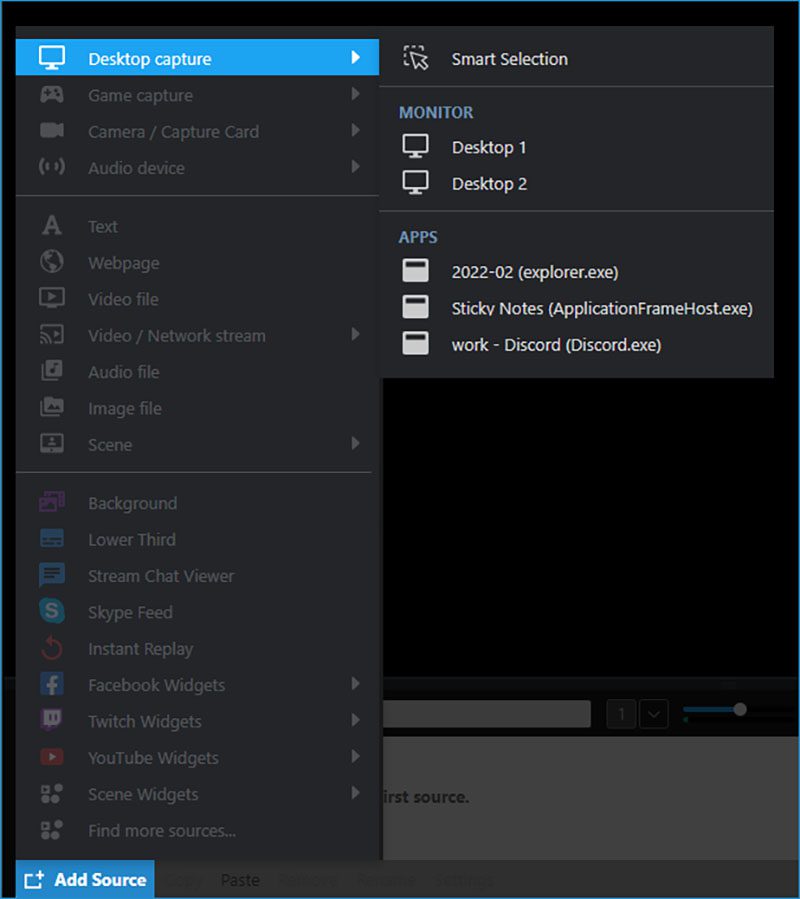
Step 1. I downloaded and installed XSplit Broadcaster on my computer. I use the Desktop Capture > Apps to capture Twitch streams on my browser.
Step 2. Then I click the Record menu at the top, the gear icon to set quality, codec (NVENC/QuickSync recommended) for videos and audio.
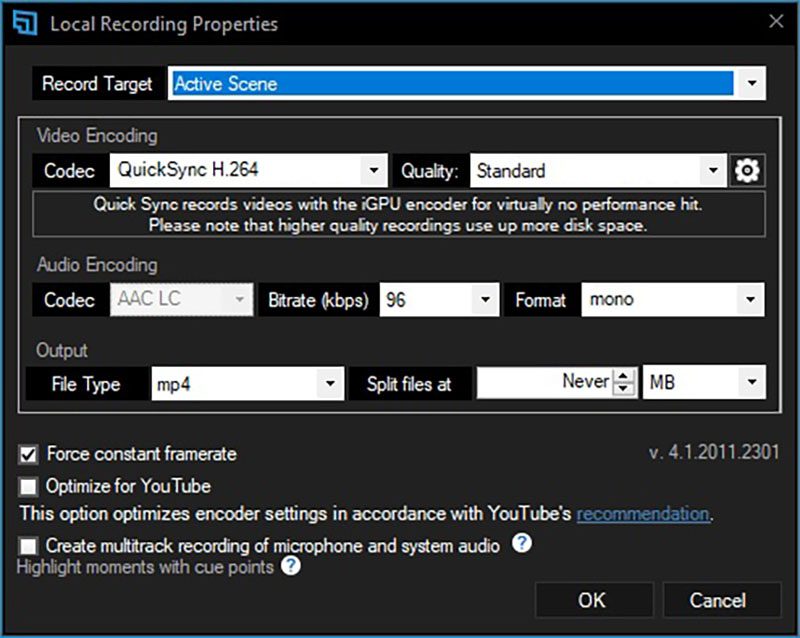
Step 3. While the Twitch stream is playing, I hit the Start Recording button(or use my custom hotkey) to capture the stream.
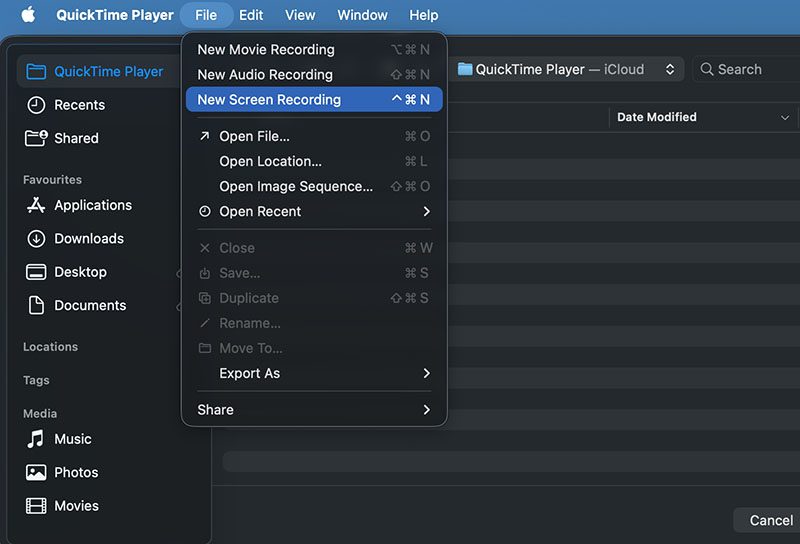
Method 4 — Record Twitch Streams on Mac with Built-in Tools
If you are a Mac user, then you probably don’t need any software. The built-in QuickTime Player or recording toolbar can be a solid Twitch stream recorder that works. I can simply enable the screen recording feature with my keyboard shortcuts. And I can record Twitch streams any time I want. macOS supports pretty high-quality output; the recording can be exported with up to 1080p quality.
How to steps:
- Step 1. I open QuickTime Player and select File > New Screen Recording. Or I can just press Shift + Command + 5 to open the built-in screenshot/recording toolbar.
- Step 2. I chose the area or the full screen of the Twitch browser tab for recording.
- Step 3. I click the Record button and let QuickTime/recording toolbar capture the streams.
3. Bonus Tip for Saving Twitch Streams
Now you know the 4 practical methods to record Twitch streams. However, as you can see, recording requires time and effort because you must monitor the process throughout. But I found another bonus tip—Moyea Twitch Downloader. I can just use its built-in browser to access and download live streams, VODs, and clips directly. Supporting up to 4K 60fps quality, it lets me download everything to MP4 at high speed. Moreover, its batch mode lets me select and save multiple videos effortlessly. To be honest, I’ll probably use it as my go-to choice for saving everything online from now on!

-
– Download videos from 1000+ websites.
– Support to download videos in batches at up to 8K resolution without ads.
– Pack captions into output video file, or save captions as independent SRT/SUP files.
– Record any online video as high-quality 1080P MP4 or MKV files.
– user-friendly and multilingual settings.

Conclusion
How to record Twitch streams? Now you have four practical Twitch recorder methods that can help you capture your favorite broadcasts easily. If you ask me which one is the best, I would say CleverGet Recorder. It’s free to start, and I can export Twitch streams with just a few simple clicks. For the most convenient option, I still consider Moyea Twitch Downloader the best choice, which saves me a lot of time and effort since it downloads streams directly instead of recording them in real time!
-
How to Use Hulu Picture-in-Picture Mode on Any Supported Device?Patrick Murray/2026-04-29
-
How to Watch Deleted YouTube Videos?Patrick Murray/2026-04-29
-
Twitch VOD: What It Is and How It WorksSunny Wen/2026-04-24
-
Full Review of Savethevideo: Is Savethevideo Safe?Patrick Murray/2026-04-21
-
Fix Guide: Prime Video Download Not WorkingPatrick Murray/2026-04-21
-
Is Crunchyroll Free? How to Watch Anime Without PayingSunny Wen/2026-04-20
-
StreamFab Netflix Downloader Review: Features, Pros & ConsCassie J./2026-03-31
-
5 Hulu Family Sharing Tips for Smooth ViewingCassie J./2026-03-30
-
Netflix Not Working on Roku? Solve It NowCassie J./2026-03-27
-
3 Proven Ways to Watch Netflix Without AdsCassie J./2026-03-25


-
Top 5 Udemy Downloaders to Download Udemy Courses on PCPatrick Murray/2025-07-03
-
Best 9 Anime Download Sites to Download Anime [Free & Paid]Patrick Murray/2024-07-12
-
4 Best DRM MPD Downloaders in 2026Leia Liu/2025-05-29
-
HBO Max with Ads VS. No Ads: What Are the DifferencesLumi/2025-05-13
-
6 Best M3U8 Downloaders to Download M3U8 PlaylistsLumi/2025-05-22
-
[2024] How to Download DRM-Protected M3U8 VideosLumi/2024-10-29
-
How to Stream Prime Video on Nintendo Switch?Patrick Murray/2024-09-14
-
How to Activate Tubi on Different Devices? [LG, FireStick, Roku, PS5…]Cassie J./2024-09-24
-
[2026 Latest Review] Best Amazon Prime Video DownloadersPatrick Murray/2025-05-16
-
How to Download an MPD Video with DRMLeia Liu/2024-09-20


Related
YT Saver Review 2026: Is It Safe, Legit, and Worth Buying?
AnyStream Review After Shutdown & Best Alternative

StreamFab All-In-One Review: Comprehensive Guide

3 Best Options to Watch ITVX Without Ads

TunePat VideoGo All-in-One Review: Is It the Best Video Downloader?
KeepStream Review: Is It Worth Trying or Should You Pass for Something Better?